An infused oil is an oil that has been filled with the properties of one or more herbs. Infused oils make great massage oils and are often used as the basis for healing salves. Some herbal infused oils, like garlic or cayenne, can be used for cooking, too.
There are two basic ways to create an infused oil, the cold method or the hot method. The cold method, which is really done at room temperature, takes time but is relatively easy and requires little attention while the oil is soaking in the herb’s qualities. The hot method requires a direct heat source and close attention but is ready for use within a relatively short period of time. In addition, some herbs, especially certain barks and roots, are better infused using heat because they don’t surrender their properties easily. Fresh, fragile plants can rot during the longer processing period required for cold infusion, too. So, be sure to consider the herbs you intend to use when you choose your method.
Infused oils can be made from fresh or dried herbs. Some herbs, like St. John’s Wort, produce a better oil when infused from fresh plant material, while others seem to do well whether they are dried or fresh. Some herbs, such as Calendula, infuse better when you prepare them for infusion using a more complex extraction method and then infusing the oil with their properties using the hot method of infusion. It’s a good idea to do a little research on the herb you’re planning to infuse so you can choose the most effective method, but in lieu of that you can choose the method that seems best to you and make a small quantity at first to check the quality. As with so many other herbal preparations, if it works well for you and yours, then you’ve chosen a good method.
Any oil can be infused with an herb. When you’re choosing the oil you want to use, keep your intended use for the finished oil in mind. I recommend using organic oils whenever possible, but as long as the oil you have chosen is expelled-pressed or cold-pressed, it should be relatively free of harmful chemicals. For the cold infusion method, I recommend you stick to oils that are liquid and pourable at room temperature. If you use the hot infusion method, you will be heating the oil gently, so butters and hard oils like Shea butter and Coconut oil can be used effectively.
A General Procedure for Making a Cold-Infused Herbal Oil
This is a basic procedure, not a recipe. I haven’t included specific measurements but have instead described the process and what to look for as you’re working. For specific recipes using this technique, see The Practical Herbalist® Recipes.
Equipment you’ll need to make a cold-infused herbal oil:
- A cutting board and sharp knife (if you’re using fresh herbs)
- A glass jar with a tightly-fitting lid (or a similar jar made from a non-reactive material)
- A blender (optional)
- A rubber scraper or spatula, preferably one that is made of a material that can be thoroughly cleaned and does not hold any odors, such as a heat-proof plastic one
- A label for your jar
After the oil has infused, you’ll need:
- A straining bag or several layers of cheese cloth and a strainer
- A bottle for the finished oil
- A label for your bottle
Ingredients for making a cold-infused herbal oil:
- A quantity of herbs or plant material, fresh or dried
- A good-quality oil that is pourable at room temperature
Procedure for making a cold-infused herbal oil:
 Prepare your herbs. If you’re using fresh herbs, clean or shake any dirt from them, although unless they’re really, really dirty you don’t need to wash them with water. Next, chop them. If you plan to use a blender (see step 4), then you’ll only need to chop them roughly, but if you don’t intend to use a blender, chop them as finely as you can. If you’re using dried herbs, crush them so they are mainly in smaller pieces, although you don’t necessarily want to powder them as that will make straining the fine particles out later more difficult.
- Place the herbs into your jar. Pack them down gently and fill the jar about three-quarters of the way full with the plant material. Leave enough room to fill the jar with oil and to shake the contents regularly so the oil will penetrate through all of the plant material. If you’re using roots or barks, fill the jar only about a third to half-way full of herb.
- Pour the oil over the herbs, filling the jar until you’ve covered the herbs by just under a quarter of an inch, or if you’re using barks or roots fill the jar until it’s about three quarters or so full.
- Blend the mixture. (This step is optional and not recommended if you’re using dried or hard herbs, such as dried roots, barks, or leaves).
- Pour the whole contents of the jar into a blender.
- Blend on a medium speed until you can see the herbs have been chopped fairly finely.
- Return the mixture to your jar, using a rubber scraper or spatula to scrape out every last bit of goodness.
- Cap the jar tightly and give it a good shake.
- Label the jar, and store it in a warm but not hot place. A sunny window where you’ll see it every day is a good spot. Remember you want the heat but not the light so keep your jar covered or use a jar with dark glass. I simply put a piece of fabric over the jar when I use this method.
- Shake the jar daily, even several times a day. This is highly recommended, although I’ve forgotten to shake jars for weeks and still had good results.
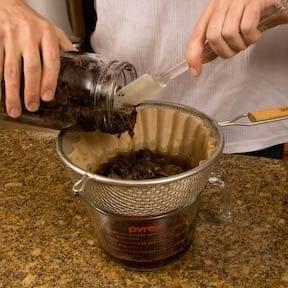
- After two to eight weeks, strain the herb material from the oil. Your oil should smell and taste of the herb and, depending on the herb, should have changed colors. As you strain it, be sure to squeeze out as much of the oil from the plant material as you can. I like to use a small, fine-mesh brewing bag to strain mine, but several layers of cheesecloth or white t-shirt material and a good strainer will work well, too.
- After you’ve strained the oil once, wash the original jar and return the oil to it. Cap it tightly and let it stand for a few hours or overnight so any remaining sediment will fall to the bottom of the jar.
- Once the sediment has all settled, carefully pour the clear oil from the jar into your bottle. You want to remove as much sediment as you can because the sediment may cause your oil to go bad in time.
- Label your jar, and store it in a cool, dark place. Be sure to include the date, the kind of herb you infused, and uses so others will also know how to use it. At this point, if you wish, you can use your oil to create a salve using The Practical Herbalist® basic procedure for making a salve.